Windows標準で導入されていて、ちょっと検証するだけなら便利なPowerShell ISEですが、実行するバージョンが標準ではWindows PowerShell 5までとなっています。これをPowerShell 7でする方法が紹介されていたので試してみました。
・Using PowerShell 7 in the Windows PowerShell ISE
https://blog.ironmansoftware.com/using-powershell-7-in-the-windows-powershell-ise/
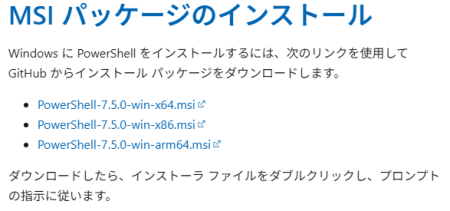
まず、端末にPowerShell 7をインストールしていない場合、MSIパッケージなどで新規導入します。ダウンロードサイトは下記となり、今回は「PowerShell-7.5.0-win-x64.msi」をインストールしました。
・Windows への PowerShell のインストール
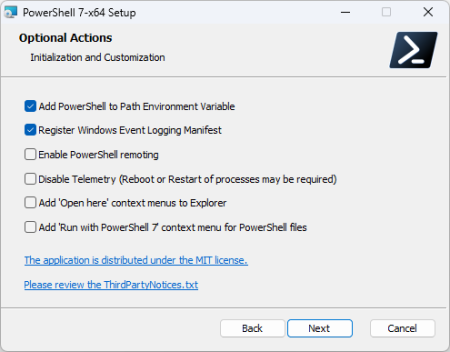
ダウンロードしたファイルを実行して、そのまま進めていけば導入は完了します。途中のOptional Actionsの下二つに、必要があればチェックを入れてください。
「Add ‘Open here’ context menus to Explorer」にチェックw入れると右クリックのコンテキストメニューに「PowerShell 7」を追加され、「Add ‘Run with PowerShell 7’ context menu for PowerShell files」にチェックを入れると右クリックのメニューに「PowerShellで実行」が追加されます。
導入が完了したら、スタートメニューを押して「PowerShell ISE」と入力、PowerShell ISEを実行します。初期状態ではプロファイルがないため、下記で紹介されているコマンドを実行します。
・Windows PowerShell ISE でプロファイルを使用する方法
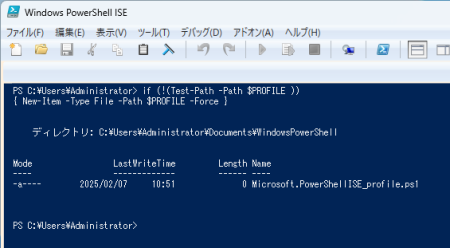
if (!(Test-Path -Path $PROFILE )) { New-Item -Type File -Path $PROFILE -Force }
次に作成したプロファイルを編集するため、「psEdit $PROFILE」と入力して実行します。するとプロファイルが自動的に開かれて編集可能となります。
psEdit $PROFILE
開かれたプロファイルに、サイトで紹介されていた下記を貼り付けて保存すれば完成です。
$psISE.CurrentPowerShellTab.AddOnsMenu.Submenus.Clear()
$psISE.CurrentPowerShellTab.AddOnsMenu.Submenus.Add("Switch to PowerShell 7", {
        function New-OutOfProcRunspace {
            param($ProcessId)

            $ci = New-Object -TypeName System.Management.Automation.Runspaces.NamedPipeConnectionInfo -ArgumentList @($ProcessId)
            $tt = [System.Management.Automation.Runspaces.TypeTable]::LoadDefaultTypeFiles()

            $Runspace = [System.Management.Automation.Runspaces.RunspaceFactory]::CreateRunspace($ci, $Host, $tt)

            $Runspace.Open()
            $Runspace
        }

        $PowerShell = Start-Process PWSH -ArgumentList @("-NoExit") -PassThru -WindowStyle Hidden
        $Runspace = New-OutOfProcRunspace -ProcessId $PowerShell.Id
        $Host.PushRunspace($Runspace)
}, "ALT+F5") | Out-Null

$psISE.CurrentPowerShellTab.AddOnsMenu.Submenus.Add("Switch to Windows PowerShell", {
    $Host.PopRunspace()

    $Child = Get-CimInstance -ClassName win32_process | where {$_.ParentProcessId -eq $Pid}
    $Child | ForEach-Object { Stop-Process -Id $_.ProcessId }

}, "ALT+F6") | Out-Null
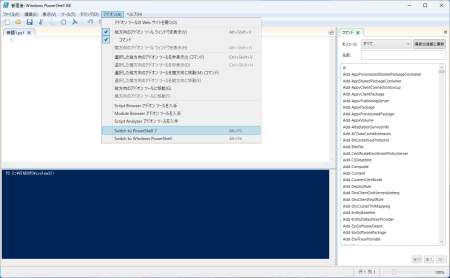
一度PowerShell ISEを終了させて、もう一度PowerShell ISEを実行すると、上部メニューのアドオンの所に“Switch to PowerShell 7”が追加されており、そちらをクリックすることでWindows PowerShell 5からPowerShell 7に切り替えることが出来るようになります。
PowerShell 7の方が、対応している.NETバージョンが新しいため、色々なことを試せるかと思います。本格的に作るまでもないようなものは、OS標準のISEで実行するのはアリですね。